


Identity Management Overview
This guide will show you how to use the PicketLink Identity Management API to manage identity data such as partitions, users, roles, groups, credentials, attributes and so forth. It will cover some core concepts and make it easier for you to understand how those concepts are applied in a project.
The first thing you should know about PicketLink IDM is that you can use it in Java SE the same way you use it in Java JEE. The main difference between those platforms is how components are exposed to your application and the built-in capabilities provided by one over another.
In Java JEE, PicketLink provides a rich and flexible CDI Extension, making a lot easier how you use the IDM API. Main components such as PartitionManager and IdentityManager are available for injection with a default configuration so you can start using them very quickly to manage your identity data. But in essence the IDM API is based on Java SE, what means you can use it in any Java-based project.
This guide will show you how to add the following capabilities to your application:
- Partition Management
- IdentityType Management
- Relationship Management
- Credential Management
- Attribute Management
- Configuration Overview
We strongly recommend you to take a look at the Identity Management Overview section of the documentation.
This guide is based on some example applications provided by our quickstarts. Check the README.md file for each quickstart for more details about how to use them.
You can also check the First PicketLink CDI Application Guide for more information about how to create a simple application.
Identity Model
The Identity Model is a set of classes that define the security structure of an application. In a nutshell, those classes will be used to represent your identity data and store it using the PicketLink IDM API. Most applications have their own set of classes and interfaces to represent users, roles, groups, permissions and so on. That is what the Identity Model is all about where PicketLink provides an abstract and flexible model from which you can create your own representations.

In order to help users to start using PicketLink with the minimal effort, PicketLink provides a Basic Model based on some very common use cases. This model provides a specific representation for users, groups, roles, partitions, permissions and relationships like grants and group memberships. You can use it directly in your project or even use it as a template for your own model. That said, you're not forced to use the Basic Model in order to use PicketLink IDM. For more details about how to provide your own model, check our documentation.
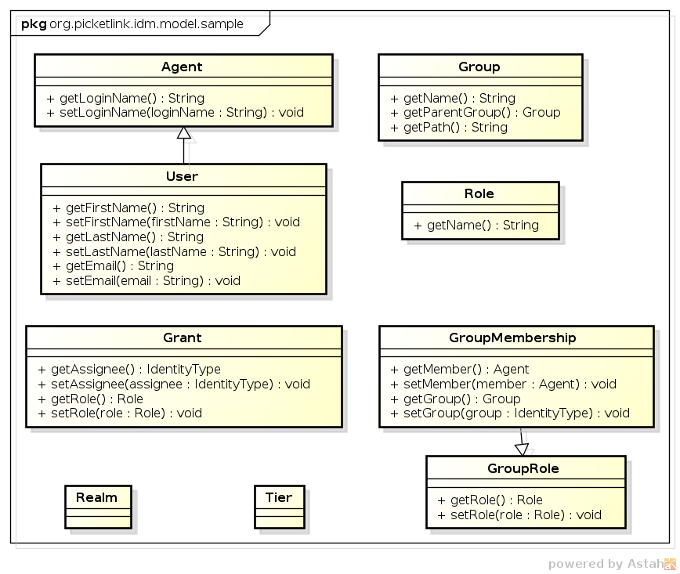
Understand the PicketLink Identity Model is crucial to use all that PicketLink IDM has to offer. Try to spend some time looking how the Basic Model was built to understand more how you can extend PickeLink IDM to better fit your requirements.
Managing Partitions
PicketLink has been designed from the ground up to support a system of partitioning, allowing the identity objects it manages to be separated into logical groupings. Partitions may be used to split identities into separate realms, allowing an application to serve multiple organisations (for example in a SaaS architecture) or to support a multi-tier application allowing each tier to define its own set of identity objects (such as groups or roles). PicketLink's architecture also allows you to define your own custom partition types, allowing more complex use cases to be supported.
When managing identity data, every single operation is executed in the scope of a partition. By default, PicketLink creates a default partition for your application during startup, so you can start managing your data using a single partition. If you're using the Basic Model (as discussed previously), partitions are repesented by the Realm type.
Partitions are managed by the PartitionManager interface. You can inject an instance into your beans as follows:
@Inject
private PartitionManager partitionManager;
You can also observe the PartitionManagerCreateEvent to initialize your partitions during application startup. As mentioned before, by default PicketLink will create a default partition if none is provided, but sometimes you may want to initialize your own partitions and don't create a default one:
@Stateless
public class IDMInitializer {

  public void createDefaultUsers(@Observes PartitionManagerCreateEvent event) {
    PartitionManager partitionManager = event.getPartitionManager();

    createUserForRealm(partitionManager, Resources.REALM.acme.name(), "bugs");
    createUserForRealm(partitionManager, Resources.REALM.umbrella.name(), "jill");
    createUserForRealm(partitionManager, Resources.REALM.wayne.name(), "bruce");
  }

  private void createUserForRealm(PartitionManager partitionManager, String realmName, String loginName) {
    Realm partition = partitionManager.getPartition(Realm.class, realmName);

    if (partition == null) {
      partition = new Realm(realmName);
      partitionManager.add(partition);
    }

    IdentityManager identityManager = partitionManager.createIdentityManager(partition);
    User user = new User(loginName);
    Password password = new Password(user.getLoginName() + "123");

    identityManager.add(user);
    identityManager.updateCredential(user, password);
  }

}
This is a good example about how to use the PartitionManager bean to create different partitions and store different users for each one.
The PartitionManager interface provides some key services to manage partitions as well create other key IDM components. In the example above it is being used to look for a Realm partition using a name:
Realm partition = this.partitionManager.getPartition(Realm.class, realmName);
It is being used to create a new partition:
this.partitionManager.add(partition);
And for last, we're also using it to create a IdentityManager instance for a specific partition so we can manage identity data such as users, credentials, roles and groups:
IdentityManager identityManager = this.partitionManager.createIdentityManager(partition);
Another important aspect of Partition Management is that you can have different identity stores(eg.: LDAP and JPA) each one storing data for a specific partition. Take a look the this documentation for more information about how to store data using different partitions and identity stores.
For more information about the the PartitionManager interface take a look at this documentation.
You can also check the PicketLink Multi-Tenancy Example quickstart for more examples about how to use partitions.
Managing Identity Types (Eg.: User, Roles and Groups)
If you look again at the Identity Model diagram, you'll notice that there is a IdentityType interface. This is the base interface for Identity objects. It declares properties that indicate whether the identity object is enabled or not, optional created and expiry dates, plus methods to read and set the owning Partition. Every single IdentityType is directly related with a specific partition. You should keep that in mind when storing them.
Usually, the representation of users, roles and groups will always be based on the IdentityType interface. But you're not tied to represent only these, if you're working with a mobile application you may want to have a representation for user's devices (eg.: cell phones, tablets, etc) and create your own implementation of the IdentityType interface.
The main component used to manage identity types is the IdentityManager. It is basically an interface with a lot of useful methods to give you complete control over your types such as:
- CRUD operations
- Query
- Credential Management
The IdentityManager can always be injected into any bean as follows:
@Inject
private IdentityManager identityManager;
IdentityManager bean is a request-scoped bean, it is not thread safe. Keep that in mind when injecting it into your beans. As mentioned before, the IdentityManager is directly related with a partition. Usually, when you inject this bean you're working in the scope of the default partition. But you may want to inject an instance using a different partition, specially if you're working in a multi-tenancy architecture. This can be easily done by just providing a producer method that returns the partition you want to use.
@SessionScoped
@Named
public class RealmSelector implements Serializable {

  @Inject
  private PartitionManager partitionManager;

  private Realm realm;

  @Produces
  @PicketLink
  public Realm select() {
    return this.realm;
  }

  public Resources.REALM getRealm() {
    if (this.realm == null) {
      return null;
    }

    return Resources.REALM.valueOf(this.realm.getName());
  }

  public void setRealm(Resources.REALM realm) {
    this.realm = this.partitionManager.getPartition(Realm.class, realm.name());
  }

}
The code above is a good example about how you can set the current partition for a given user session. The following method
public void setRealm(Resources.REALM realm) {
  this.realm = this.partitionManager.getPartition(Realm.class, realm.name());
}
is receiving a Enum value which maps to a specific partition supported by the application. Inside this method the PartitionManager interface is used to obtain the corresponding partition from the Identity Store and store it internally. Now, every time you inject a IdentityManager PicketLink will create one based on this partition. Look at this producer method:
@Produces
@PicketLink
public Realm select() {
  return this.realm;
}
Here the @PicketLink qualifier annotation is used to indicate that PicketLink should use the returned partition for every single IDM operation.
So far we have seem what is the IdentityManager, how it is related with your partitions and how to get an instance to start managing your identity types. However, we didn't talk about how to use it to store your identity types. The IdentityManager interface provides methods to CRUD your identity types and this is the easiest part.
User user = new User("jdoe");

user.setFirstName("Jane");
user.setLastName("Doe");

identityManager.add(user); // let's store user 'jdoe'

Group group = new Group("employees");

identityManager.add(group); // let's store group 'employees'

Role admin = new Role("admin");

identityManager.add(admin); // let's store role 'admin'
Simple isn't ? Is just a matter of instantiating your type, populate it with some data and use the IdentityManager to store it. The same applies when you're updating:
User user = BasicModel.getUser(identityManager, "jdoe");

user.setEmail("jdoe@jboss.org");

identityManager.update(user); // let's update user's email
or removing:
User user = BasicModel.getUser(identityManager, "jdoe");

identityManager.remove(user); // let's remove user 'jdoe'
You may notice that in all examples above the BasicModel class is being used. As discussed in the Identity Model section, PicketLink provides a default identity model implementation, which we call Basic Model. The BasicModel class is basically a utility class with a lot of useful methods to easily manage all types provided by the Basic Model. As you can see in the examples, we're using the BasicModel.getUser to retrieve an User instance from the identity store. If you're using the Basic Model in your application, you'll find this class very helpful.
Managing Relationships (Eg.: Granting Roles, Group Membership, etc)
When designing your identity model, define only your identity types isn't enough. You also need to define how they relate with each other in a manner that you create some meaninful relationships between them.
A good example of a relationship is when you need to grant a role to an user or add an user to a group, or even tell that an user plays a specific role in a group. This is what relationships is all about.
The same way the Basic Model provides some built-in identity types ready for use, it also provides some common relationships types. Are they:
- Grant - used to grant a Role to an User or Group.
- GroupMembership - used to add an user as a member of a group.
- GroupRole - used to tell that an user plays a specific role in a group
These are very common cases of relationships from a security perspective. You usually need to define roles for users and groups, make an user member of a group or define a role for him inside a group.
But again, you're not tied to use only those relationship types. The beauty of PicketLink is that you can even create your own relationships according with your requirements !
For more information about relationship types and how to create your own types, plese check our documentation.
The same way identity types are managed by the IdentityManager interface, relationships are managed by a specific interface called RelationshipManager. But differently than identity types, relationships don't belong to a specific partition. This is an important thing to keep in mind, actually they help to reference different identity types from different partitions. For example, you can store an user in Partition A and also have a Role in Partition B. It is possible to create a Grant relationship using both User and Role, even if they belong to different partitions !
That said, the RelationshipManager can also be inject into any of your beans as follows:
@Inject
private RelationshipManager relationshipManager;
Or you can create it manually from a PartitionManager instance as follows:
RelationshipManager relationshipManager = this.partitionManager.createRelationshipManager();
Manage relationships using this interface is pretty simple, here are some examples:
User bob = BasicModel.getUser(identityManager, "bob"); // let's retrieve user 'bob'
Role superuser = BasicModel.getRole(identityManager, "superuser"); // let's retrieve role 'superuser'

BasicModel.grantRole(relationshipManager, bob, superuser); // now grant role 'superuser' to 'bob'
You may notice that we're also using the BasicModel class to help us to create the relationship. But the above is equivalent to the following:
User bob = BasicModel.getUser(identityManager, "bob");
Role superuser = BasicModel.getRole(identityManager, "superuser");

Grant grant = new Grant(bob, superuser);

identityManager.add(grant);
For more information about how to manage relationships, please look at the documentation.
If we want to check if a role was granted to an user we can just use:
User bob = BasicModel.getUser(identityManager, "bob");
Role superuser = BasicModel.getRole(identityManager, "superuser");

BasicModel.hasRole(relationshipManager, bob, superuser);
Or we can use the Relationship Query API as follows:
RelationshipQuery<Grant> query = relationshipManager.createRelationshipQuery(Grant.class);

query.setParameter(Grant.ASSIGNEE, bob);
query.setParameter(GroupRole.ROLE, superuser);

List<Grant> result = query.getResultList();

if (!result.isEmpty()) {
  // we found a Grant for usser 'bob' and role 'superuser'
}
You can even get all roles granted for an user:
RelationshipQuery<Grant> query = relationshipManager.createRelationshipQuery(Grant.class);

query.setParameter(Grant.ASSIGNEE, bob);

List<Grant> result = query.getResultList();

for (Grant grant : result) {
  // iterating over the user roles
}
For some very useful and working examples about how to use the Query API, take at look at those classes.
Managing Credentials and Authentication
PicketLink IDM provides a easy and flexible API that allows you to manage credentials and perform authentication. The Credential API is based on two main concepts:
- Only
Accounttypes are passive of authentication. - You can use any type of credential you want. However, PicketLink provides some built-in credential types for Username/Password, Time-based One Time Password (TOTP), DIGEST and X509 certificates.
If you look the Identity Model, you'll notice that there is a special interface called Account. It is the base interface for identities that are capable of authenticating. Since the authentication process may not depend on one particular type of attribute (not all authentication is performed with a username and password) there are no hard-coded property accessors defined by this interface. It is up to each application to define the Account implementations required according to the application's requirements.
An example of Account type is the User type provided by the Basic Model. For the sake of this guide, we'll use the User type to demonstrate how to update and validate credentials.
Credentials are also managed by the IdentityManager interface. The example below shows how you can use it to update the credentials for an user.
User user = BasicModel.getUser(identityManager, "jsmith");
Password password = new Password("abcd1234")

identityManager.updateCredential(user, password); // let's update user's credential
Once the user has a credential, you can validate it and authenticate the user as follows:
User user = BasicModel.getUser(identityManager, "jsmith");
UsernamePasswordCredentials credential = new UsernamePasswordCredentials();
Password password = new Password("abcd1234");

credential.setUsername(user.getLoginName());
credential.setPassword(password);

identityManager.validateCredentials(credential);

if (Status.VALID.equals(credential.getStatus()) {
  // successful validation
} else {
  // invalid credentials
}
Please check the documentation for more information about the built-in credential types and more details about the Credential API. There you will also find how to extend PicketLink and provide your own credential types.
PicketLink also provides some useful quickstarts in this area:
Managing Attributes
PicketLink provides a nice way to manage attributes for identity model types. In another words, you can manage attributes for most of the supported types like partitions, identity types and relatinship types.
Attributes are supported in two flavors:
- Formal attributes - Strong-typed and directly defined in your types as properties. Eg.: User.loginName, User.firstName, etc.
- Ad-hoc attributes - Weak-typed and stored as key/value pairs.
When creating your own identity model types, you'll usually prefer formal attributes to store the state. In this case you just need to define a property in your type mapped with the @AttributeProperty annotation.
But sometimes, you may need some flexibility on how attributes are created/updated/removed. So you don't need to change your types to support new attributes. Here is an example about how to set ad-hoc attributes to a type.
User user = BasicModel.getUser(identityManager, "jsmith");

user.setAttribute(new Attribute<Integer>("QuestionTotal", 2));
user.setAttribute(new Attribute<String>("Question1", "What is favorite toy?"));
user.setAttribute(new Attribute<String>("Question1Answer", "Gum"));
user.setAttribute(new Attribute<String>("Question2", "What is favorite word?"));
user.setAttribute(new Attribute<String>("Question2Answer", "Hi"));

identityManager.update(user);
However, you should use ad-hoc attributes very wisely as they're not type-safe.
PicketLink also supports queries based on attributes. What mean you can find a specific type by providing the attribute name and value you want to match.
For more information about Attribute Management, check our documentation.
Configuration Overview
When using Java JEE you need a minimal configuration to start using PicketLink IDM in your application. PicketLink provides some defaults if you want to use a File-based or JPA-based configuration. In both cases, PicketLink will always use the Basic Model as the default identity model.
File-based Default Configuration
A File-based configuration is very handy for demos, development and testing purposes, it allows you to start using PicketLink very quickly. This configuration is enabled when your application does not provide a IDM configuration and when no JPA Entity classes are found in your application's classpath mapped with the PicketLink JPA Annotations.
This quickstart is a good example about how an application looks like when using the File-based default configuration.
JPA-based Default Configuration
The JPA-based configuration is enabled when JPA Entity classes are found in your application's classpath mapped with the PicketLink JPA Annotations. The good news is that PicketLink provides a set of JPA entities which can be used with the Basic Model. Those entities provide all the necessary mapping to store the Basic Model types.
To get those entities in your project you just need to add the following dependency to your pom.xml:
<dependency>
  <groupId>org.picketlink</groupId>
  <artifactId>picketlink-idm-simple-schema</artifactId>
  <scope>runtime</scope>
</dependency>
You should also provide a producer to the EntityManager you want to use.
@PersistenceContext
@Produces
private EntityManager picketlinkEntityManager;
When using JPA, if you have a single EntityManager in your application you can produce it just like above. However, if you have multiple ones you must annotate the producer with the @PicketLink qualifier.
It is important to highlight that the JPA entity classes provided by picketlink-idm-simple-schema are just a default mapping for the Basic Model. You're not forced to use it, the same way you're not forced to use the Basic Model. Actually, we strongly recommend users to design their own identity model (probably using the Basic Model as an example) and also use the picketlink-idm-simple-schema as an example about how to map your identity model types using JPA.
Providing Your Own Configuration
All configuration is done during your application startup, where PicketLink provides some hooks that can be used to provide your own IDM configuration. Configure IDM is pretty simple, you'll usually use a fluent Configuration API from where you can provide your own configuration.
One of this hooks is provided by the IdentityConfigurationEvent. This event is fired during your application startup and allows you to get a reference to the IdentityConfigurationBuilder from where you can provide your configuration.
public static class IDMConfiguration {

  public void observeIdentityConfigurationEvent(@Observes IdentityConfigurationEvent event) throws Exception {
    IdentityConfigurationBuilder builder = event.getConfig();

    builder
      .named("custom-config")
        .stores()
          .jpa()
            .supportAllFeatures();
  }
}
In the example above we're configuring IDM to use a JPA-based identity store, so you can store your identity data using a database.
You can also provide your IDM configuration by producing one or more IdentityConfiguration instances:
@Produces
public IdentityConfiguration produceFileConfiguration() {
  IdentityConfigurationBuilder builder = new IdentityConfigurationBuilder();

  builder
    .named("file-based.config")
      .stores()
        .file()
          .supportAllFeatures();

  return builder.build();
}
Or you can even produce your own PartitionManager instance.
@PicketLink
@Produces
public PartitionManager producePartitionManager() {
  IdentityConfigurationBuilder builder = new IdentityConfigurationBuilder();

  builder
    .named("ldap.config")
      .stores()
        .ldap()
          .baseDN("dc=jboss,dc=org")
          .bindDN("uid=admin,ou=system")
          .bindCredential("passwd")
          .url("ldap://localhost:389")
          .mapping(Agent.class)
            .baseDN("ou=Agent,dc=jboss,dc=org")
            .objectClasses("account")
            .attribute("loginName", "uid", true)
            .readOnlyAttribute("createdDate", "createTimeStamp")
          .mapping(User.class)
            .baseDN("ou=User,dc=jboss,dc=org")
            .objectClasses("inetOrgPerson", "organizationalPerson")
            .attribute("loginName", "uid", true)
            .attribute("firstName", "cn")
            .attribute("lastName", "sn")
            .attribute("email", EMAIL)
            .readOnlyAttribute("createdDate", "createTimeStamp")
          .mapping(Role.class)
            .baseDN("ou=Roles,dc=jboss,dc=org")
            .objectClasses("role")
            .attribute("name", "cn", true)
            .readOnlyAttribute("createdDate", "createTimeStamp")
          .mapping(Group.class)
            .hierarchySearchDepth(4)
            .objectClasses("group")
            .attribute("name", "cn", true)
            .readOnlyAttribute("createdDate", "createTimeStamp")
            .parentMembershipAttributeName("member")
          .mapping(Grant.class)
            .forMapping(Role.class)
            .attribute("assignee", "member")
          .mapping(GroupMembership.class)
            .forMapping(Group.class)
            .attribute("member", "member");

  return new DefaultPartitionManager(builder.buildAll());
}
Please take a look at the Identity Configuration section for more details about the Configuration API and the IDM configuration.
Summary
Hopefully this guide helped you to understand some core concepts of PicketLink IDM like the Identity Model, PartitionManager and IdentityManager beans, what are the key features and references about how to extend PicketLink to fit your needs.
We covered some important and basic concepts that will help you to deep dive into some more advanced concepts of PicketLink and create more advanced and complex usecases.
Most of the things we covered in this guide are also demonstrated by the quickstarts, from where you can get much more usage examples considering different usecases.
Fell free to contribute with your own guides and help us to improve PicketLink ! Enjoy it !